
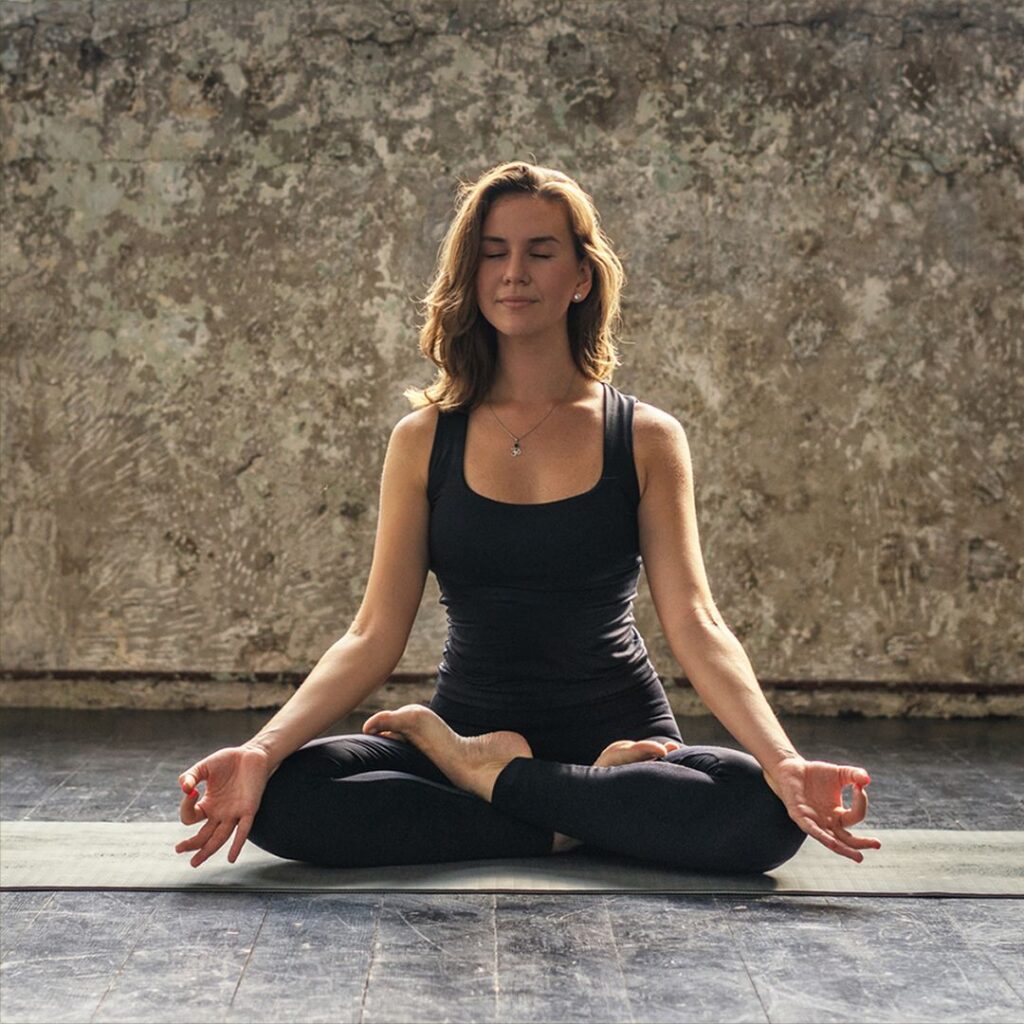
Lotus Pose
Lotus Pose is one of the most famous yoga positions in the world. Many people think of this pose when they picture meditation, while others associate it with yoga practice. The position shows a person sitting with crossed legs, with their feet resting on top of their thighs. As a result, this creates a stable and peaceful seat.
This ancient pose has been used for thousands of years. Yogis love it for long meditation sessions, and meditators find it valuable too. In fact, the pose gets its name from the lotus flower. This beautiful flower grows in muddy water; however, it blooms above the surface. Like the flower, this pose symbolizes rising above hard times and finding inner peace.
People around the world practice Lotus Pose for meditation, breathing work, and quiet thought. The position creates a strong base; therefore, it helps the body stay upright with little effort. When done right, it allows energy to flow freely while keeping the mind calm and focused.
Sanskrit
The traditional Sanskrit name for Lotus Pose is Padmasana. This word combines two ancient Sanskrit terms: “Padma” means lotus flower, while “Asana” means pose or seat. Together, they create the full name that yoga practitioners have used for centuries.
Sanskrit is an ancient language from India and serves as the original language of yoga. Furthermore, it’s the language of many spiritual texts. Learning Sanskrit names helps practitioners connect with yoga’s rich history and links them to ancient ways. When teachers use these names in class, they honor both the practice’s roots and the cultural heritage.
Many yoga studios teach both names, using English and Sanskrit versions. Consequently, this helps students understand the global yoga community. Knowing both names creates a bridge that connects modern practice with ancient wisdom.
How to
Getting Started
Learning Lotus Pose takes time and patience. The body needs a proper warm-up before trying this position. First, sit on a yoga mat or soft surface. Next, place both legs stretched out in front. Then take a few deep breaths and relax the body completely.
Positioning the First Leg
Begin by bending the right knee and bringing the right foot toward the body. Use both hands to gently lift the right foot, then place it on top of the left thigh. The sole should face upward, and the heel should rest close to the lower belly.
Adding the Second Leg
Next, bend the left knee carefully and lift the left foot with care. Place it on top of the right thigh the same way. Both feet should now rest on opposite thighs with the soles facing up. Ideally, the knees should touch the ground or come close to it.
Maintaining Proper Alignment
Keep the spine straight and tall during the pose. Imagine a string pulling the top of your head toward the sky, while the shoulders relax down and back, moving away from the ears. Rest the hands on the knees with palms facing either up or down—choose what feels better.
Holding the Pose
Breathe naturally and hold the position for several breaths. Beginners might only hold it for 30 seconds; in contrast, skilled practitioners can sit for many minutes. Always listen to your body and never force anything that causes sharp pain.
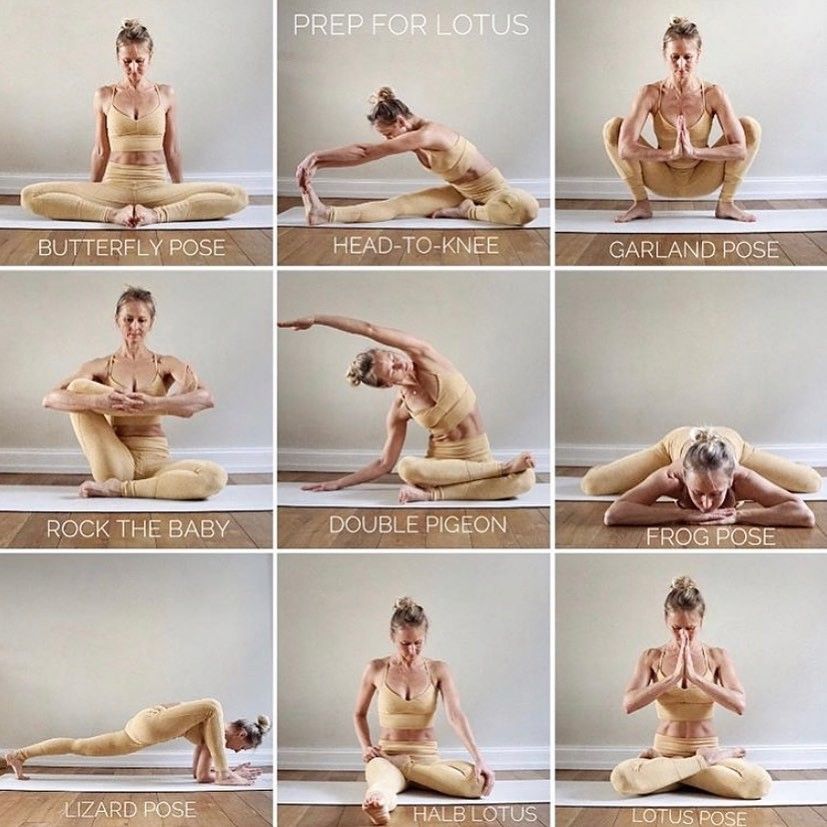
Lotus Pose Variations
Not everyone can do full Lotus Pose right away; however, several versions exist. These modified versions make this pose easier to do while still providing many benefits. Additionally, they are gentler on the body.
Half Lotus Pose
Half Lotus Pose offers a gentler option that works well for those building flexibility. This version uses the same basic setup; however, it only places one foot on top of the opposite thigh, while the other foot rests normally on the floor under the opposite thigh.
To practice Half Lotus, start in a comfortable seated position. Bend one knee and place that foot on top of the opposite thigh. Meanwhile, let the other leg stay in a simple crossed position. As a result, this creates less pressure on the hips and knees while still providing good stability.
Building Flexibility Gradually
Many people practice Half Lotus for months or even years before trying full Lotus. There is no rush to move forward; in fact, some practitioners find Half Lotus perfectly comfortable for their whole yoga journey. Moreover, the pose still offers great support for meditation and breathing work.
Half Lotus with Props
Using props makes Half Lotus even easier and more comfortable. Props help support the body and reduce strain on tight areas. Common props include yoga blocks, blankets, bolsters, and cushions.
Place a folded blanket or cushion under the sitting bones. This lift tilts the pelvis forward slightly; as a result, crossing the legs becomes easier. Furthermore, the extra height reduces pressure on the knees and creates better alignment through the spine.
Try placing yoga blocks under the knees if they float far above the ground. This support prevents strain and allows the muscles to relax. Over time, flexibility improves; then the blocks can be removed or replaced with thinner props.
Lotus in a Chair
Chair Lotus brings the benefits of this pose to people with limited movement. This version works well for those with knee or hip injuries, and anyone who finds floor sitting difficult can benefit. In fact, it proves that yoga can adapt to meet everyone’s needs.
Sit near the front edge of a sturdy chair with feet flat on the floor. Lift one foot and rest the ankle on top of the opposite thigh. The shin should run roughly parallel to the floor while the bottom foot remains planted firmly for stability.
For a deeper version, both ankles can rest on opposite thighs while sitting in the chair. The body still maintains an upright posture and the breath flows freely. Therefore, this seated version provides many mental benefits without requiring floor flexibility.
Lotus Pose Basics
Understanding the Foundation
Understanding Lotus Pose basics helps practitioners avoid injury while gaining the most benefits. Several key points make this pose safe and effective; consequently, paying attention to these details transforms a simple sitting position into a powerful yoga posture.
The base starts with the pelvis and sitting bones, which should press evenly into the ground or cushion below. When the pelvis tilts too far forward or backward, it creates strain through the spine. Therefore, finding neutral alignment lets the body relax and settle into the pose.
Knee Position
Knee position matters greatly in Lotus Pose. The knees should move toward the ground rather than pointing upward. When knees stay high, it indicates that tight hips need more preparation. Never force the knees down, as this can damage delicate joint structures.
Ankle and Foot Placement
The ankles and feet also need attention. The tops of the feet should rest comfortably on the thighs without twisting. If the ankles feel pinched or strained, the body needs more time. Consequently, using a modified version prevents injury while building needed flexibility.
Spinal Alignment
Spinal alignment creates the classic upright quality of Lotus Pose. The lower back maintains its natural curve without arching too much, while the chest lifts gently and the neck stays long and relaxed. This vertical alignment allows for easy breathing and supports mental clarity.
Beginner Tips
New practitioners should approach Lotus Pose with patience and respect. The body needs time to build the needed flexibility and strength; therefore, rushing into the full pose often leads to frustration or injury.
Explore the Pose
Start Simple
Taking time to explore Lotus Pose slowly builds understanding and ability. Start with simpler seated positions—try Easy Pose first or basic crossed sitting. These basic positions prepare the hips and knees for more challenging versions.
Practice Hip-Opening Exercises
Practice hip-opening exercises regularly to prepare for Lotus. Poses like Butterfly, Pigeon, and Wide-Angle Seated Forward Bend create the needed flexibility. Moreover, regular practice over weeks and months makes a clear difference in how the body responds.
Start with Short Durations
Try the pose for just a few breaths at first. Even 10 to 15 seconds provides valuable practice without overtiring the joints. Gradually increase the time as comfort improves. Some days the body will feel more open than others, which is completely normal.
Alternate Sides
Switch which leg goes on top during practice sessions. This prevents imbalances from building over time. If the right foot always rests on top, the right hip becomes more flexible while the left hip does not develop equally. Therefore, switching sides creates balanced growth throughout the body.
Be Mindful!
Listen to Your Body
Mindfulness during Lotus Pose practice prevents injury while building body awareness. Pay close attention to all sensations, especially in the knees, hips, and ankles. Learn the difference between productive stretching and warning signs of strain.
A gentle pulling feeling in the outer hips is normal and acceptable. However, sharp, shooting pains in the knees are warning signals that should never be ignored. If any joint feels painful rather than stretched, exit the pose immediately.
Move with Control
Never bounce or force the legs into position. Instead, use slow, controlled movements when entering and leaving the pose. Quick or jerky motions can damage ligaments and tendons, which need time to adjust. Consequently, gentleness and patience always win over force and hurry.
Honor Daily Variations
Listen to your body’s messages each day. Some days the hips feel open and ready; other days, tightness or fatigue makes the pose harder. Adjust your practice without judgment, as yoga is about working with the body as it is, not as we wish it would be.
Why We Love This Pose
Stability for Meditation
Yoga teachers and students love Lotus Pose for many reasons. The position offers unique benefits that few other poses can match, and its popularity has lasted for good reasons beyond tradition.
The stability of Lotus Pose makes it ideal for long meditation sessions. Once settled into the position, the body needs little muscle effort to stay upright. As a result, the mind can focus on breathing or meditation without physical distraction. Furthermore, the crossed legs create a solid base that will not shift or wobble.
Grounding Energy
Many practitioners report feeling grounded and centered in this pose. The symmetrical positioning creates a sense of balance and completeness. Energy seems to circulate within the body rather than scattering outward; therefore, this contained feeling supports deeper states of focus and inner peace.
Improved Posture
The pose naturally encourages good posture and spine alignment. Unlike slouching in a chair, Lotus Pose promotes an upright position that improves breathing. The lungs can fully expand while the diaphragm moves freely. This enhanced breathing ability calms the nervous system and reduces stress.
Symbolic Meaning
Lotus Pose carries deep symbolic meaning that resonates with many people. Sitting in this ancient position connects practitioners to thousands of years of yogic tradition, creating a tangible link to wisdom teachers and spiritual seekers who came before. This sense of connection enriches the practice and adds meaning and purpose.
Life Lessons
The challenge of achieving Lotus Pose teaches valuable lessons about patience and persistence. Progress often comes slowly and requires consistent effort over time. Learning to work steadily toward a goal builds character both on and off the mat; consequently, the lesson extends far beyond yoga practice.
Teacher Tips
Prioritize Safety
Yoga instructors who teach Lotus Pose should put student safety first above all else. Not every body will be able to perform this position, which is perfectly acceptable. Offering modifications ensures everyone can participate, regardless of flexibility level.
Warm Up Properly
Always demonstrate proper warm-up sequences before teaching Lotus Pose. The hips, knees, and ankles need thorough preparation to handle this deep position. Therefore, include poses like Bound Angle, Reclined Pigeon, and Seated Hip Circles in the warm-up routine.
Watch Students Carefully
Observe students carefully as they attempt the pose and look for warning signs. Knees pointing toward the ceiling are a red flag, while faces showing discomfort signal problems. Gently suggest modifications and offer props before students push too far and risk injury. A good teacher knows when to encourage effort and when to suggest backing off.
Teach Safe Exits
Teach students the proper way to exit Lotus Pose safely. Coming out of the position requires as much care as entering it. Instruct students to gently lift each foot and remove it from the opposite thigh. Then, extend the legs slowly, shake them out, and take a few breaths to reset the body.
Emphasize Individual Differences
Stress that flexibility varies greatly among people. Some individuals have naturally mobile hips, which makes Lotus Pose easier to achieve quickly. In contrast, others have bone structure or past injuries that create limitations. Help students appreciate their unique bodies and encourage them not to compare themselves to others.
Share Deeper Benefits
Share the mental and spiritual benefits of the pose rather than focusing only on the physical aspects. Explain how Lotus Pose can support meditation practice and contribute to emotional balance. This broader context helps students understand the value and why they might want to work toward the position.
Preparatory and Counter Poses
Preparatory Poses
Opening the Hips
Preparing the body properly makes Lotus Pose safer and easier to perform. Several yoga positions help open the hips and stretch the needed muscles; consequently, including these poses in regular practice builds flexibility over time.
Butterfly Pose targets the inner thighs and groin area. Sit with the soles of the feet together and let the knees fall to the sides. This stretches the hip adductors; in fact, this pose directly prepares the same areas used in Lotus.
Deep Hip Work
Pigeon Pose creates deep hip opening in the outer hip and glutes. The front leg position mirrors one side of Lotus Pose; therefore, regular practice of Pigeon gradually increases the hip flexibility needed for Lotus.
Seated Forward Bend lengthens the hamstrings while also stretching the lower back. Tight hamstrings pull on the pelvis, making sitting positions uncomfortable. Consequently, stretching this area improves overall seated posture.
Additional Preparation
Cow Face Pose stacks the knees in a way that prepares for Lotus. The hip rotation needed in Cow Face directly translates to the movements required; moreover, practicing both sides equally creates balanced flexibility.
Reclined Hand-to-Big-Toe Pose safely stretches the hamstrings while supporting the back. This lying-down position allows for deep stretching without compressing the spine. It is an excellent preparatory pose, especially for people with tight legs.
Counter Poses
Releasing Tension
Counter poses help the body recover after holding Lotus Pose. These positions release any built-up tension while also restoring normal blood flow. Spending time in counter poses prevents stiffness and maintains joint health.
Staff Pose extends both legs forward while keeping the spine straight. This simple position reverses the knee and hip bending of Lotus; as a result, it allows blood flow to return normally in the lower legs.
Active Recovery
Downward-Facing Dog stretches the entire back body after sitting. The inversion brings fresh blood flow to the brain, while the active nature of the pose awakens muscles that were quiet during meditation.
Wind-Relieving Pose gently compresses the abdomen while also releasing the hips. Lying on the back and hugging the knees relieves any lower back compression that may have occurred. This pose feels soothing after deep hip work.
Final Release
Supine Twist rinses out the spine and hips. The twisting motion releases tension through the back and outer hips, creating a sense of ease and completion after practice.
Child’s Pose provides a restful counter position. The forward fold releases the hips and back in a gentle way; additionally, this pose allows the mind to settle and helps absorb the benefits of practice.
Anatomy
Hip Joint Structure
Understanding the anatomy involved in Lotus Pose helps practitioners work safely and effectively. Multiple joints and muscle groups must work together to create this position; therefore, knowledge of these parts guides intelligent practice choices.
The hip joints are the main focus of Lotus Pose. These ball-and-socket joints allow for wide ranges of motion in many directions. Lotus Pose requires external rotation and flexion at the hips; furthermore, the degree of rotation needed is quite large—much more than everyday movements require.
Individual Variations
Hip anatomy varies considerably among people. The shape of the hip socket and thigh bone differs from person to person. Some people have naturally shallow sockets that allow greater rotation; in contrast, others have deeper sockets or different bone angles that limit rotation regardless of flexibility.
Muscle Groups
Several muscle groups affect hip mobility for this pose. The hip external rotators must be flexible, including the piriformis and deep gluteal muscles. The hip flexors need sufficient length—the iliopsoas is particularly important for comfortable sitting. Additionally, the adductors along the inner thighs also stretch significantly in this position.
Knee Safety
The knee joints bend deeply in Lotus Pose; however, they should not twist. Healthy knee function requires the bones to stack properly without torque. If the hips lack sufficient rotation, the knees may experience unhealthy twisting forces. This is why hip preparation is crucial for knee safety.
Ankle Considerations
The ankle joints and surrounding ligaments also play a role. The tops of the feet rest against the thighs, creating pressure through the ankle. Bony structures in the foot and ankle determine comfort levels at this contact point; consequently, some people have more padding or different bone shapes that affect their experience.
Spinal Support
The spine maintains its natural curves during proper Lotus Pose alignment. The lumbar spine keeps a gentle curve without rounding backward, while the thoracic spine stays relatively neutral and the cervical spine extends softly. This alignment requires core strength and posture awareness.
Put Lotus Pose into Practice
Daily Integration
Making Lotus Pose part of a regular yoga routine enhances its benefits. Regular practice creates steady progress while also bringing deeper understanding. There are many ways to incorporate this pose into daily life.
Start and end meditation sessions in Lotus Pose or a comfortable variation. Even a few minutes of seated practice helps build tolerance; moreover, the pose becomes more familiar with regular exposure as the body gradually adapts.
Breathing Exercises
Include Lotus Pose in pranayama and breathing exercises. The stable seated position supports focused breath work. Try alternate nostril breathing, three-part breath, or simple breath observation while in the pose.
Casual Practice
Use Lotus variations during reading or quiet activities. Sitting in Half Lotus while reading spiritual texts creates a mindful atmosphere; similarly, journaling in this position works well. This casual use helps the body become comfortable and accustomed to the position.
Timing Matters
Practice the pose at different times of day to observe changes in flexibility. The body is often stiffer in the morning and more open in the evening. Understanding these patterns helps practitioners choose the best times for deeper practice.
Set Goals
Set realistic goals for Lotus Pose development. Perhaps aim to hold Half Lotus for five minutes comfortably before attempting full Lotus. Alternatively, focus on getting both knees closer to the ground over several months. Small, measurable goals create motivation while tracking progress.
Learn from Teachers
Join a yoga class that focuses on seated poses and meditation. Learning from a skilled teacher provides valuable feedback and correction; furthermore, group practice offers encouragement and inspiration from fellow students.
About Our Contributors
This complete guide draws from traditional yoga teachings and modern anatomical understanding. The information reflects time-tested wisdom passed down through generations of yoga practitioners while also incorporating current knowledge about body mechanics and safe movement practices.
Experienced yoga teachers have shared their insights about teaching Lotus Pose effectively. Their years of working with diverse students inform the safety considerations and modifications described. Moreover, real classroom experience shapes the practical advice offered throughout this article.
Anatomy experts have reviewed the structural information to ensure accuracy. Understanding how joints function prevents injury while promoting healthy practice. This scientific perspective complements traditional yoga wisdom.
Long-time meditation practitioners have shared their experiences working extensively with Lotus Pose. Their insights about the mental and spiritual benefits bring depth and richness to the discussion; additionally, personal practice stories demonstrate how the pose supports inner growth.
Outside+
Additional Resources
Exploring yoga content from quality sources enhances practice and understanding. Many reputable websites offer additional guidance and information on Lotus Pose; furthermore, books provide detailed information and video platforms show demonstrations. Seeking information from skilled teachers and established yoga organizations ensures accurate instruction.
Community Support
Online yoga communities provide support and encouragement for practitioners. Sharing experiences with others working toward Lotus Pose creates connection while building motivation. Forums dedicated to yoga offer spaces for questions, and social media groups provide discussion opportunities.
Workshops and Retreats
Yoga workshops often include focused work on challenging poses. Attending a workshop specifically about hip opening or seated poses accelerates progress. The intensive format allows for deeper exploration than typical classes provide.
Study Materials
Anatomy books designed for yoga practitioners offer valuable visual references. Seeing detailed illustrations of hip structure helps understand personal limits and possibilities; consequently, this knowledge empowers intelligent practice choices.
Meditation Practice
Meditation resources complement Lotus Pose practice beautifully. The pose serves as a perfect foundation for sitting meditation; moreover, learning various meditation techniques enriches the time spent in the position and makes the practice more meaningful.
Conclusion
Lotus Pose stands as one of yoga’s most iconic and meaningful positions. Its distinctive appearance makes it instantly recognizable worldwide, while the ancient heritage adds to its appeal. More importantly, the pose offers genuine benefits including physical stability, mental focus, and spiritual connection.
Approaching this pose with patience and respect serves practitioners well. The body needs time to build the needed flexibility and strength; therefore, rushing or forcing creates risk without bringing rewards. However, regular, gentle practice over months and years brings steady progress and growth.
Remember that variations are valid expressions of the pose. Half Lotus, chair versions, and supported versions all have worth. The full traditional position is not superior to these alternatives—it is simply different. Meeting the body where it is today shows wisdom and self-compassion.
The true value of Lotus Pose extends beyond its physical form. The discipline needed to work toward the position teaches patience and persistence, while the stable seat it provides supports meditation and enables inner exploration. Furthermore, the connection to yoga’s ancient traditions enriches modern practice and brings timeless wisdom.
Whether someone achieves full Lotus Pose or prefers a modified version matters less than the journey itself. The journey offers gifts including learning to work with the body mindfully and building valuable skills. Additionally, developing the flexibility to sit comfortably supports a lifetime of yoga practice and meditation.
Frequently Asked Questions
Q: How long does it take to learn Lotus Pose?
The time needed varies greatly based on individual flexibility and bone structure. Some people achieve the pose within months, while others need years of regular practice. Hip anatomy plays a significant role—some bodies have greater natural rotation than others.
Daily hip-opening exercises speed progress along with regular yoga practice. However, some practitioners may never achieve full Lotus due to skeletal structure, which is perfectly acceptable. Half Lotus and other variations provide similar benefits.
Q: Why do my knees hurt when I try Lotus Pose?
Knee pain during Lotus Pose usually signals that the hips lack sufficient flexibility. When hips cannot rotate adequately, the knees compensate using unhealthy twisting motions, which creates strain on knee ligaments and cartilage.
If you experience knee pain, exit the pose immediately. Practice hip-opening exercises instead and never force the knees toward the ground. Consider working with Half Lotus or seated variations until hip flexibility improves substantially. Protecting the knees should always be the top priority.
Q: Can everyone eventually do Lotus Pose?
Not everyone will achieve full Lotus Pose, which is important to understand. Bone structure plays a significant role—the shape of the hip socket and thigh bone determine maximum hip rotation. Some people have anatomy that naturally prevents the deep rotation required.
Previous injuries, arthritis, or joint conditions might also prevent full expression. This does not reflect poorly on someone’s yoga practice or indicate lack of dedication. Many skilled yogis and meditation teachers use modifications throughout their entire practice journey. Furthermore, the mental benefits of the pose are accessible through variations.
Q: Is Lotus Pose bad for the knees?
Lotus Pose is not inherently bad for knees when practiced correctly. Problems arise when practitioners force the position before their hips are ready. Proper execution requires sufficient hip flexibility so the knees do not twist unnaturally.
Using appropriate progressions, warming up thoroughly, and respecting personal limits protects knee health. Many people practice Lotus safely for decades without experiencing knee issues. The key is patience, proper preparation, and hip-opening work.
Q: What’s the best way to start working toward Lotus Pose?
Begin with regular hip-opening practice rather than attempting the full pose immediately. Include poses like Butterfly, Pigeon, and Cow Face in daily practice sessions. Start with simple crossed sitting and gradually work toward Half Lotus.
Use props like blankets and blocks to support the body. Practice for short durations at first and gradually increase time as comfort improves. Work with a qualified yoga teacher who can assess your individual anatomy and provide personalized guidance. Most importantly, approach the practice with patience and avoid comparison to others.