
Dancer Pose is one of the most beautiful and graceful poses in yoga. This standing balance pose looks like a dancer mid-performance. One leg lifts behind the body. Arms reach skyward. Additionally, many yoga students dream of mastering this elegant posture. But it takes practice, patience, and proper alignment to do it safely.
Furthermore, this pose offers amazing benefits for the body and mind. It strengthens the legs and ankles. It also opens the chest and shoulders. Moreover, it improves balance and focus. This helps in daily life beyond the yoga mat. Whether someone is just starting their yoga journey or has been practicing for years, understanding the right alignment makes all the difference.
The Sanskrit name for this pose is Natarajasana. This means “King of the Dance.” In fact, the pose honors Lord Shiva. He is known as the cosmic dancer in Hindu tradition. When practiced with awareness and care, Dancer Pose can transform how people feel in their bodies. It connects them to something larger than themselves.
Understanding The Foundation Of Dancer Pose
Before diving into the alignment tips, it helps to understand what makes Dancer Pose special. This is a complex pose. It combines several elements at once. Specifically, the practitioner must balance on one leg. They also bend backward. They lift the other leg high behind them. As a result, this requires strength, flexibility, and concentration all working together.
Building A Strong Foundation Takes Time
Unfortunately, many people rush into the full expression of the pose. They don’t build the necessary foundation first. Consequently, this can lead to frustration or even injury. Instead, the key is to approach Dancer Pose step by step. Respect where the body is today. Don’t force it into a shape it’s not ready for yet.
Multiple Muscle Groups Working Together
In addition, the pose works multiple muscle groups simultaneously. First, the standing leg must stay strong and stable. Second, the lifted leg engages the hamstrings and glutes. Meanwhile, the back muscles work to create the backbend. At the same time, the shoulders open as the arm reaches back. Ultimately, all these movements happen while maintaining balance. This is no small feat.
Alignment Tips For King Dancer Pose (Natarajasana)
Proper alignment in Dancer Pose protects the body from injury. It also helps practitioners get the most benefit from the posture. Therefore, these seven tips provide a roadmap for practicing this pose safely and effectively. In particular, each tip addresses a specific part of the body. It shows how it should be positioned.
1. Firm Your Foundation
The standing leg is everything in Dancer Pose. Without a solid foundation, the rest of the pose crumbles. For this reason, think of the standing leg as the trunk of a tree. It needs to be strong and rooted. This supports everything above it.
Avoiding The Locked Knee Mistake
Unfortunately, many practitioners make the mistake of locking their standing knee. In reality, this actually makes the leg weaker and less stable. Instead, keep a micro-bend in the knee. As a result, this small bend engages the quadriceps muscles. It helps maintain better balance. Furthermore, the micro-bend also protects the knee joint from hyperextension.
In addition, the standing leg should feel active from the hip all the way down to the foot. For example, imagine drawing energy up from the ground through the leg. Similarly, the quadriceps should be firm and engaged. As a result, the kneecap lifts slightly as the thigh muscles activate. Ultimately, this engagement creates a stable base. It supports the entire pose.
Keeping Your Hips Level
Another common mistake is allowing the standing hip to jut out to the side. Consequently, this throws off the alignment of the entire body. Instead, keep the hips level. Stack them over the standing leg. Specifically, the hip should stay directly over the knee and ankle. This creates a straight line of support.
2. Root Down Through Your Foot
The standing foot is the connection point between the body and the earth. Therefore, how this foot makes contact with the ground affects everything else in the pose. In fact, a strong, grounded foot provides the stability needed for balance.
To begin, start by spreading the toes wide. As a result, this creates a broader base of support. Next, press down through all four corners of the foot. Specifically, these corners are the big toe mound, the pinky toe mound, and the two sides of the heel. When all four corners press down evenly, the foot creates a stable platform.
Unfortunately, many people tend to roll onto the outer edge of the foot. Others collapse the inner arch. In reality, both of these patterns destabilize the pose. Instead, maintain even weight distribution across the entire foot. Furthermore, the arch should stay lifted without being forced. In fact, this natural lift happens when the foot muscles engage properly.
Creating Stability Through Your Toes
Similarly, pay attention to the toes as well. The toes should press down gently. Don’t grip or clench them. In fact, gripping creates tension. This tension travels up the leg. It makes balancing harder. Instead, let the toes spread and relax. They should still maintain contact with the floor. As a result, this creates a foundation that is both strong and relaxed.
The Importance of Ankle Strength
Additionally, the ankle also plays an important role in stability. Keep the ankle joint strong. Center it over the foot. Therefore, avoid letting the ankle wobble or collapse inward. Ultimately, a stable ankle helps maintain balance throughout the pose.
3. Square Your Hips
Hip alignment is crucial in Dancer Pose. Unfortunately, many practitioners allow the lifted hip to open toward the side. This happens as the leg lifts behind them. Consequently, this creates a twisting motion through the pelvis. It can strain the lower back.
Instead, work to keep both hips pointing forward in the same direction. For example, imagine the hip bones as headlights on a car. These headlights should point straight ahead. They shouldn’t have one shining off to the side. As a result, this keeps the pelvis in a neutral position.
In addition, keeping the hips square takes conscious effort. This is especially true as the lifted leg rises higher. In fact, the natural tendency is for the hip to open as the leg lifts. Therefore, resist this tendency. Engage the core muscles. Keep the lifted hip drawing down toward the floor.
One helpful technique is to slightly rotate the inner thigh of the lifted leg toward the ceiling. As a result, this internal rotation helps keep the hip from opening too much. Moreover, it also protects the lower back from excessive twisting. However, the rotation should be gentle and controlled. Don’t force it.
Furthermore, the hips should also stay level from side to side. Don’t let the standing hip hike up toward the shoulder. Don’t let the lifted hip drop down. Instead, both hip bones should remain at the same height. Ultimately, this level alignment protects the spine. It creates better balance.
4. Open Your Chest
The chest opening in Dancer Pose is what gives the pose its beautiful, expansive quality. Specifically, this chest lift happens as the upper back bends. The shoulders draw back. However, this opening must happen with proper alignment. This avoids compression in the lower back.
Instead of just arching backward, think of lifting the chest forward and up. In particular, the sternum, or breastbone, leads the way. As the chest lifts, the collarbones widen. They spread apart. As a result, this creates space across the front of the shoulders.
Moreover, the shoulders should move down the back. Keep them away from the ears. Unfortunately, many people scrunch their shoulders up toward their ears. This happens when they reach back for the lifted foot. Consequently, this creates tension in the neck. It limits the chest opening. Instead, actively draw the shoulder blades down the back.
In addition, the shoulder blades should also move toward each other on the back. This action is called retraction. It helps open the chest. For example, imagine squeezing a pencil between the shoulder blades. As a result, this creates the right amount of engagement. It doesn’t force the movement.
Furthermore, as the chest opens, breathe deeply into the front of the ribs. In fact, the breath helps create more space and ease in the pose. For instance, each inhale can lift the chest a little higher. Meanwhile, each exhale helps relax any unnecessary tension.
5. Draw Your Lower Belly & Ribs In
Core engagement is essential for protecting the lower back in Dancer Pose. Without proper core support, all the backbending load falls on the lumbar spine. Consequently, this can cause compression and discomfort.
Specifically, the lower belly should draw gently in toward the spine. As a result, this engagement activates the deep core muscles. This particularly affects the transverse abdominis. For example, think of zipping up a tight pair of jeans. Similarly, the same inward and upward movement happens in the lower abdomen.
In addition, the front ribs should also stay knitting together. They shouldn’t splay open. When the ribs flare forward, it creates excessive arching in the lower back. Instead, draw the front ribs down and in. As a result, this helps maintain length in the lower back.
However, this core engagement doesn’t mean holding the breath. It doesn’t mean creating rigid tension. Instead, the belly should stay firm. But it should still allow for full breathing. For instance, think of it as a supportive hug around the midsection. It’s not a tight grip.
Furthermore, the engagement of the lower belly and ribs works together with the chest opening. As the chest lifts up and forward, the belly and ribs stay drawing in. As a result, this creates a balance between opening and supporting. Ultimately, the spine can bend safely when the core provides this stability.
Moreover, core strength also helps with balance. When the core is engaged, the body has better control over small adjustments. In fact, these tiny movements keep practitioners from tipping over. Therefore, building core strength through other poses makes Dancer Pose more accessible.
6. Focus Backbending From The Upper Part of Your Back
The backbend in Dancer Pose should come primarily from the upper back. It shouldn’t come from the lower back. In fact, this is one of the most important alignment principles. It protects the spine. Specifically, the thoracic spine is the upper and middle back. It’s designed for more rotation and extension than the lumbar spine.
Unfortunately, many people default to bending from the lower back. This happens because it’s easier and more familiar. In reality, the lower back is naturally more mobile than the upper back. However, this creates compression in the lumbar vertebrae. Over time, this can lead to pain or injury.
Therefore, to shift the backbend higher in the spine, focus on the area between the shoulder blades. Specifically, this is the thoracic region. For example, imagine lifting and bending from this area. Don’t bend from the waist. As a result, the chest leads the movement. The upper back follows.
One helpful image is to think of draping the upper body over a large ball. Position it at the mid-back. In this way, the ball supports the backbend. It keeps it distributed evenly. Consequently, this prevents the sharp fold that happens when all the bending concentrates in one spot.
Another technique is to engage the muscles along the spine. Specifically, the erector spinae muscles run the length of the back. When these muscles engage evenly, they support the backbend. They protect the vertebrae. However, the engagement should feel active. It shouldn’t feel strained.
Finally, flexibility in the upper back takes time to develop. Unfortunately, many people sit for long hours. This rounds the upper back forward. In fact, Dancer Pose helps reverse this pattern. But the body needs time to open. Therefore, be patient and consistent with practice.
7. Be Patient & Ease Into It
Patience is perhaps the most important alignment tip of all. In fact, Dancer Pose is an advanced posture. It requires time to develop. Consequently, rushing into the full expression before the body is ready creates problems. It prevents real progress.
Instead, start with smaller variations of the pose. For example, perhaps the lifted leg only comes a few inches off the ground at first. Similarly, maybe the back bend is minimal in the beginning. Nevertheless, these modified versions still provide benefits. They help build the necessary strength and flexibility.
Furthermore, progress happens gradually with consistent practice. Each time someone practices Dancer Pose, the body learns a little more. Specifically, the muscles get stronger. In addition, the balance improves. Moreover, the flexibility increases. However, this happens slowly. It takes weeks and months, not a single session.
Therefore, listen to the body’s signals during practice. Some sensation is normal and even helpful. For instance, a gentle stretch or muscle engagement feels productive. However, sharp pain, pinching, or strain means something is wrong. Consequently, back off when these sensations appear.
In addition, the breath is a good indicator of whether someone is forcing the pose. If the breath becomes short, rapid, or held, it’s a sign to ease up. Instead, the breath should remain smooth and steady throughout the pose. In fact, this indicates the body is working within its capacity.
Finally, remember that everyone’s body is different. Some people naturally have more flexibility in their back. Meanwhile, others have stronger balance. Similarly, some have longer limbs. This changes how the pose looks. Therefore, compare progress to oneself. Don’t compare to other practitioners or pictures online.
How to Get Into King Dancer Pose (Natarajasana)
Getting into Dancer Pose safely involves several clear steps. Therefore, following these steps helps ensure proper alignment from the beginning.

Starting From Mountain Pose
First, start by standing in Mountain Pose. Keep feet together. Rest arms at the sides. Initially, take a few deep breaths. This centers the mind and body.
Next, shift the weight onto the right foot. Then, ground down through all four corners of the foot. At the same time, engage the right leg muscles. This creates stability. After that, bend the left knee. Lift the left foot behind the body. Finally, reach back with the left hand. Catch hold of the inside of the left ankle or foot.
Finding Balance With Counterforce
Now, press the left foot back into the left hand. At the same time, reach the right arm forward and up. In fact, these two actions work together. They create the pose. Specifically, the foot presses back. The chest lifts forward. As a result, this creates a counterbalance. It makes the pose more stable.
Next, begin to hinge forward from the hips. At the same time, lift the left leg higher. In other words, the chest moves forward. The leg lifts back. Meanwhile, keep the core engaged. Keep the hips square. Throughout this process, the standing leg stays strong and stable.
Using A Focal Point For Balance
To help with balance, find a focal point. This is called a drishti. Specifically, pick a spot on the floor or wall that doesn’t move. Then, keep the gaze steady on this point. As a result, this helps the brain maintain equilibrium.
Once the pose feels stable, stay for several breaths. Initially, the pose might only last for three to five breaths at first. However, with practice, the duration can increase.
Exiting The Pose Safely
To exit, slowly lower the lifted leg. Release the grip on the foot. Afterward, stand back in Mountain Pose. Pause before switching sides.
Natarajasana (King Dancer Pose): Tips for Beginners
Beginners often feel intimidated by Dancer Pose. But there are many ways to make it more accessible. In fact, the most important tip for beginners is to use props and modifications. Furthermore, there’s no shame in using support while building strength and balance.
Using Props For Support
First, a yoga strap is incredibly helpful for beginners. Instead of holding the foot directly, loop the strap around the lifted foot. As a result, this creates more length. It makes the pose easier to access. Moreover, the strap allows someone to work on balance and strength. They don’t have to worry about reaching the foot yet.
In addition, practicing near a wall provides support for balance. Specifically, stand close enough to touch the wall with the extended hand if needed. As a result, this safety net helps build confidence. Over time, rely on the wall less and less. Balance improves with practice.
Another beginner modification is to keep the lifted leg lower. In fact, the leg doesn’t need to rise high to gain benefits from the pose. For example, even lifting the knee a few inches off the ground works on balance. It also works on core strength. Similarly, the backbend can also stay minimal at first.
Furthermore, focus on one element at a time. Don’t try to perfect everything at once. For instance, spend some practice sessions just working on standing leg stability. Meanwhile, other sessions can focus on hip alignment. As a result, breaking the pose into pieces makes it less overwhelming.
Warming Up Properly
In addition, warming up properly helps beginners access the pose more easily. For example, practice hip openers like Pigeon Pose. This prepares the hip flexors. Similarly, do gentle backbends like Cobra Pose. This warms up the spine. Moreover, Sun Salutations are an excellent way to warm up the entire body.
Building Foundation Through Supporting Poses
Furthermore, building strength in supporting poses helps with Dancer Pose. For instance, Tree Pose improves single-leg balance. Similarly, Warrior III builds standing leg strength. In addition, Bridge Pose opens the chest. It strengthens the back. Ultimately, regular practice of these poses creates a foundation for Dancer Pose.
Advancing The Pose
For practitioners who have mastered the basic version of Dancer Pose, there are ways to deepen the practice. However, advancing the pose should only happen when the foundational alignment is solid and consistent. In fact, never sacrifice proper alignment just to go deeper.
Using Both Hands For A Deeper Backbend
One way to advance is to reach back with both hands. Hold the lifted foot with both hands. As a result, this creates a deeper backbend. It requires more flexibility. In addition, the chest can lift higher. The leg can kick back more strongly. Notably, this version is sometimes called Full Dancer Pose or King Dancer Pose.
When using both hands, the grip changes. Specifically, grab the outside of the foot with both hands. Then, the elbows point up toward the ceiling. Meanwhile, the shoulders stay down. Keep them away from the ears despite the arm position. In fact, this requires significant shoulder flexibility.
Adding Neck Extension
Another advanced variation involves looking up toward the ceiling. Some even look back toward the lifted foot. As a result, this adds a neck extension to the backbend. However, this should only be attempted when the rest of the pose is stable. In fact, neck alignment is delicate. It should never be forced.
In addition, some practitioners work on lifting the leg higher behind them. For instance, the goal for some is to have the shin vertical. Others want the foot higher than the head. Obviously, this requires extreme flexibility and strength. While it’s an impressive expression of the pose, it’s not necessary for experiencing its benefits.
Working Toward Longer Holds
Furthermore, advanced practitioners also work on holding the pose for longer periods. For example, instead of five breaths, they might stay for ten or fifteen breaths. As a result, the longer hold builds endurance. It builds mental focus. Moreover, it also allows time to refine the alignment within the pose.
In addition, transitioning into Dancer Pose from other poses adds complexity. For instance, coming into Dancer from Warrior III creates a flow. Moving from Dancer into Standing Splits also creates a flow. Consequently, these transitions challenge balance and control in new ways.
Finally, remember that advancement isn’t just about the external shape of the pose. Instead, deepening the practice also means bringing more awareness and presence to each moment. In fact, even in the basic version of the pose, there are layers of refinement to explore.
Benefits Beyond The Physical Practice
While the physical benefits of Dancer Pose are significant, the mental and emotional benefits are equally valuable. Specifically, balancing poses require intense focus. This naturally quiets the mind. In fact, when all attention must go to staying upright, there’s no room for worrying about other things.
In addition, the pose builds confidence. Practitioners see their progress over time. What once seemed impossible becomes achievable through patient practice. Furthermore, this lesson translates off the mat. It goes into other areas of life. Consequently, challenges that seem insurmountable can be approached with the same patience and persistence.
Moreover, Dancer Pose also cultivates grace and beauty. Specifically, the elegant shape of the pose reminds practitioners that strength doesn’t have to look harsh. In fact, power and beauty can exist together. As a result, this can be especially empowering for women in yoga. They sometimes feel pressure to choose between being strong or graceful.
Finally, the pose requires vulnerability. Standing on one leg with the body stretched open feels exposing. However, practicing this vulnerability in a safe environment helps people. They become more comfortable with being seen. Consequently, this can impact relationships and self-expression in positive ways.
Common Mistakes To Avoid
Understanding common mistakes helps practitioners avoid them in their own practice. First, one frequent error is leaning too far forward. People do this in an attempt to lift the leg higher. Consequently, this collapses the chest. It defeats the purpose of the backbend. Instead, the chest should stay lifted. This might mean the leg stays lower.
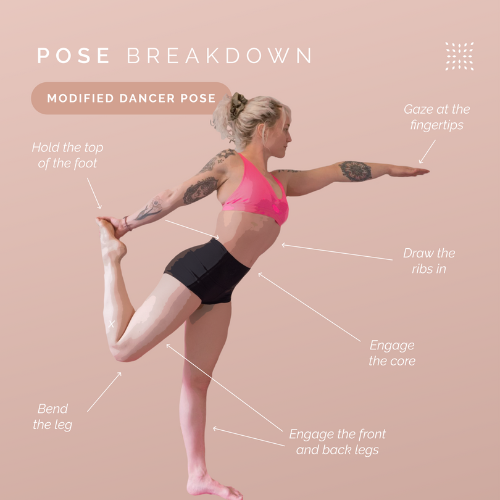
Another mistake is gripping the toes instead of the foot. In fact, holding just the toes puts strain on the toe joints. It doesn’t provide a secure grip. Therefore, always hold the foot around the ankle. You can also hold the top of the foot. This gives better control and safety.
In addition, some people forget to breathe in challenging poses. Consequently, holding the breath creates tension. It makes balance harder. Instead, keep the breath flowing smoothly throughout the entire pose. In fact, the breath should remain the anchor of the practice.
Furthermore, comparing oneself to others in class is a mental mistake. It affects physical practice. In reality, everyone’s body is different. Everyone progresses at their own pace. Therefore, focus on personal growth. Don’t focus on how the pose looks compared to someone else’s version.
Finally, skipping the warm-up is a mistake that can lead to injury. In fact, Dancer Pose requires warm muscles and joints. Therefore, always take time to prepare the body. Do this before attempting this advanced posture.
Creating A Regular Practice
Consistency is key for improvement in Dancer Pose. In fact, practicing several times per week yields better results. This is better than occasional intense sessions. Moreover, even short practice sessions of ten to fifteen minutes can create progress over time.
First, create a dedicated space for yoga practice at home. Fortunately, this doesn’t need to be large or fancy. In fact, a cleared area with enough room to extend the arms is sufficient. As a result, having a dedicated space makes it easier to maintain regular practice.
Next, set realistic goals for the practice. Instead of aiming to master the full pose immediately, set smaller milestones. For example, perhaps the first goal is to balance steadily in the basic version for five breaths. Then, the next goal might be to reach the foot without a strap.
In addition, track progress by taking photos or keeping a journal. Sometimes improvements happen so gradually. They’re hard to notice day to day. However, looking back over weeks or months reveals how much has changed. As a result, this documentation provides motivation to continue.
Finally, find a supportive community for the practice. For instance, this might be a yoga class. It could be an online group. It might be friends who also practice yoga. Ultimately, sharing the journey with others provides accountability and encouragement. Moreover, learning from others’ experiences enriches personal practice.
Conclusion
Dancer Pose is a beautiful and challenging posture. It offers numerous benefits for body, mind, and spirit. In fact, the seven alignment tips covered in this article provide a framework. They help you practice safely and effectively. Ultimately, these tips work together. They create a balanced, stable, and graceful expression of the pose.
In reality, the journey to mastering Dancer Pose is not about reaching a destination. Instead, it’s about the process. It’s about learning, growing, and discovering what the body can do. Specifically, each practice session is an opportunity to refine alignment. It builds strength. It deepens awareness. Furthermore, progress happens gradually with patience and consistent effort.
Remember that yoga is a personal practice. Therefore, there’s no need to rush or compare. In fact, the pose will look different on every body. That’s exactly how it should be. Ultimately, what matters most is practicing with mindfulness. Respect the body’s limits. Find joy in the journey.
Whether someone is a complete beginner or an experienced practitioner, there’s always something new to discover in Dancer Pose. In fact, the pose continues to teach lessons about balance, strength, grace, and patience. Moreover, these lessons extend far beyond the yoga mat. They go into daily life. Ultimately, with proper alignment and a patient approach, anyone can experience the transformative power of this iconic yoga posture.
Frequently Asked Questions
What muscles does Dancer Pose strengthen?
Dancer Pose strengthens many muscle groups throughout the body. Specifically, the standing leg quadriceps work hard to maintain stability and balance. In addition, the glutes and hamstrings of the lifted leg engage. They extend the hip and lift the leg. Meanwhile, the back muscles work. The erector spinae particularly creates and supports the backbend. Furthermore, the core muscles stabilize the torso. This includes the abdominals and obliques. Finally, the shoulders and arms also strengthen. They reach and hold position.
How can I improve my balance for Dancer Pose?
Improving balance takes consistent practice and patience. First, start by practicing simpler balance poses. Try Tree Pose or Warrior III. As a result, these build the foundation needed for Dancer Pose. Next, strengthen the ankles and feet. Do specific exercises like toe raises and ankle circles. In addition, practice focusing on a fixed point. This helps the brain maintain equilibrium. Moreover, core strengthening exercises also significantly improve balance. Ultimately, regular practice is the most important factor. In fact, the more time spent on one leg, the better the balance becomes.
Is Dancer Pose safe if I have lower back problems?
People with lower back issues should approach Dancer Pose cautiously. They may need to avoid it during acute pain episodes. In fact, the backbending component can aggravate some back conditions. This happens if it’s not done properly. Therefore, always consult with a healthcare provider first. Do this before attempting poses that challenge a problem area. If cleared to practice, focus on the alignment tips about engaging the core. Also focus on bending from the upper back. Initially, keep the backbend minimal at first. Furthermore, a qualified yoga teacher can provide modifications. These are specific to individual needs.
How long should I hold Dancer Pose?
Beginners typically hold Dancer Pose for three to five breaths on each side. As a result, this allows time to work on alignment. It doesn’t create fatigue. As strength and balance improve, the hold time can increase. Try eight to ten breaths. Meanwhile, advanced practitioners might hold for fifteen breaths or longer. However, the quality of the pose matters more than the duration. In fact, it’s better to hold for a shorter time with proper alignment. This is better than staying longer with collapsed form.
Can I practice Dancer Pose during pregnancy?
Pregnant individuals should be cautious with balance poses. This is especially true in later trimesters. The center of gravity shifts during this time. In addition, the hormone relaxin also increases joint looseness. This affects stability. If already comfortable with Dancer Pose before pregnancy, a modified version with wall support might be appropriate. This works in early pregnancy. However, always get clearance from a healthcare provider first. In fact, many pregnant people choose to focus on other poses. They select ones that feel more stable and comfortable. Ultimately, safety for both parent and baby is the top priority.